How Can I Access My Raspberry Pi Remotely? The Ultimate Guide For Tech Enthusiasts
Alright, listen up, folks! If you're reading this, chances are you're knee-deep in the world of Raspberry Pi and wondering how on earth you can access it remotely. Let’s face it, the Raspberry Pi is a game-changer, but what’s the point of owning one if you can't control it from anywhere? Today, we’re going deep into the nitty-gritty of remote access for your Raspberry Pi. Whether you're a beginner or a seasoned pro, this guide has got your back.
Remote access to your Raspberry Pi opens up a whole new world of possibilities. Imagine being able to tweak your home automation setup or monitor your security cameras from the comfort of your couch—or even from the other side of the planet. Sounds pretty sweet, right? But where do you even start? Don’t worry; we’ve got the answers you need.
Before we dive into the specifics, let’s quickly talk about why remote access is such a big deal. For starters, it gives you unparalleled flexibility. You don’t have to be physically present to manage your projects. Plus, it’s a great way to learn more about networking, security, and troubleshooting—all skills that will come in handy in the tech world. Now, without further ado, let’s get started!
- H D Hub 4 U Your Ultimate Guide To The Best Entertainment And More
- 5movierulz 2022 Your Ultimate Guide To Stream Movies Like A Pro
Understanding the Basics of Remote Access
First things first, let’s break down what remote access really means. When you access your Raspberry Pi remotely, you're essentially connecting to it over a network—whether it’s your local Wi-Fi or the internet. This allows you to control your Pi from another device, like your laptop, smartphone, or even another Raspberry Pi. Pretty cool, huh?
There are several methods you can use to achieve this, each with its own set of pros and cons. Some of the most popular options include SSH (Secure Shell), VNC (Virtual Network Computing), and even cloud-based services. We’ll explore each of these methods in detail, so you can decide which one works best for you.
Why Should You Care About Remote Access?
Let’s be real—Raspberry Pi isn’t just a toy; it’s a powerful tool that can handle a wide range of tasks. From running servers to managing IoT devices, the possibilities are endless. But what happens when you’re not around to physically interact with your Pi? That’s where remote access comes in.
- Movierulzcom Telugu Your Ultimate Guide To Streaming Telugu Movies
- 5movierulz 2024 Download Telugu The Ultimate Guide For Movie Enthusiasts
- It saves you time by eliminating the need to physically connect to your Pi.
- It enhances productivity by allowing you to manage multiple projects from a single location.
- It improves security by enabling you to monitor your Pi’s activity remotely.
So, whether you’re a DIY enthusiast or a professional developer, remote access is a must-have skill in your arsenal.
Setting Up SSH for Remote Access
SSH, or Secure Shell, is one of the most common methods for accessing your Raspberry Pi remotely. It’s secure, reliable, and easy to set up. Plus, it’s already built into the Raspberry Pi OS, so you don’t need to install any extra software.
Here’s how you can set it up:
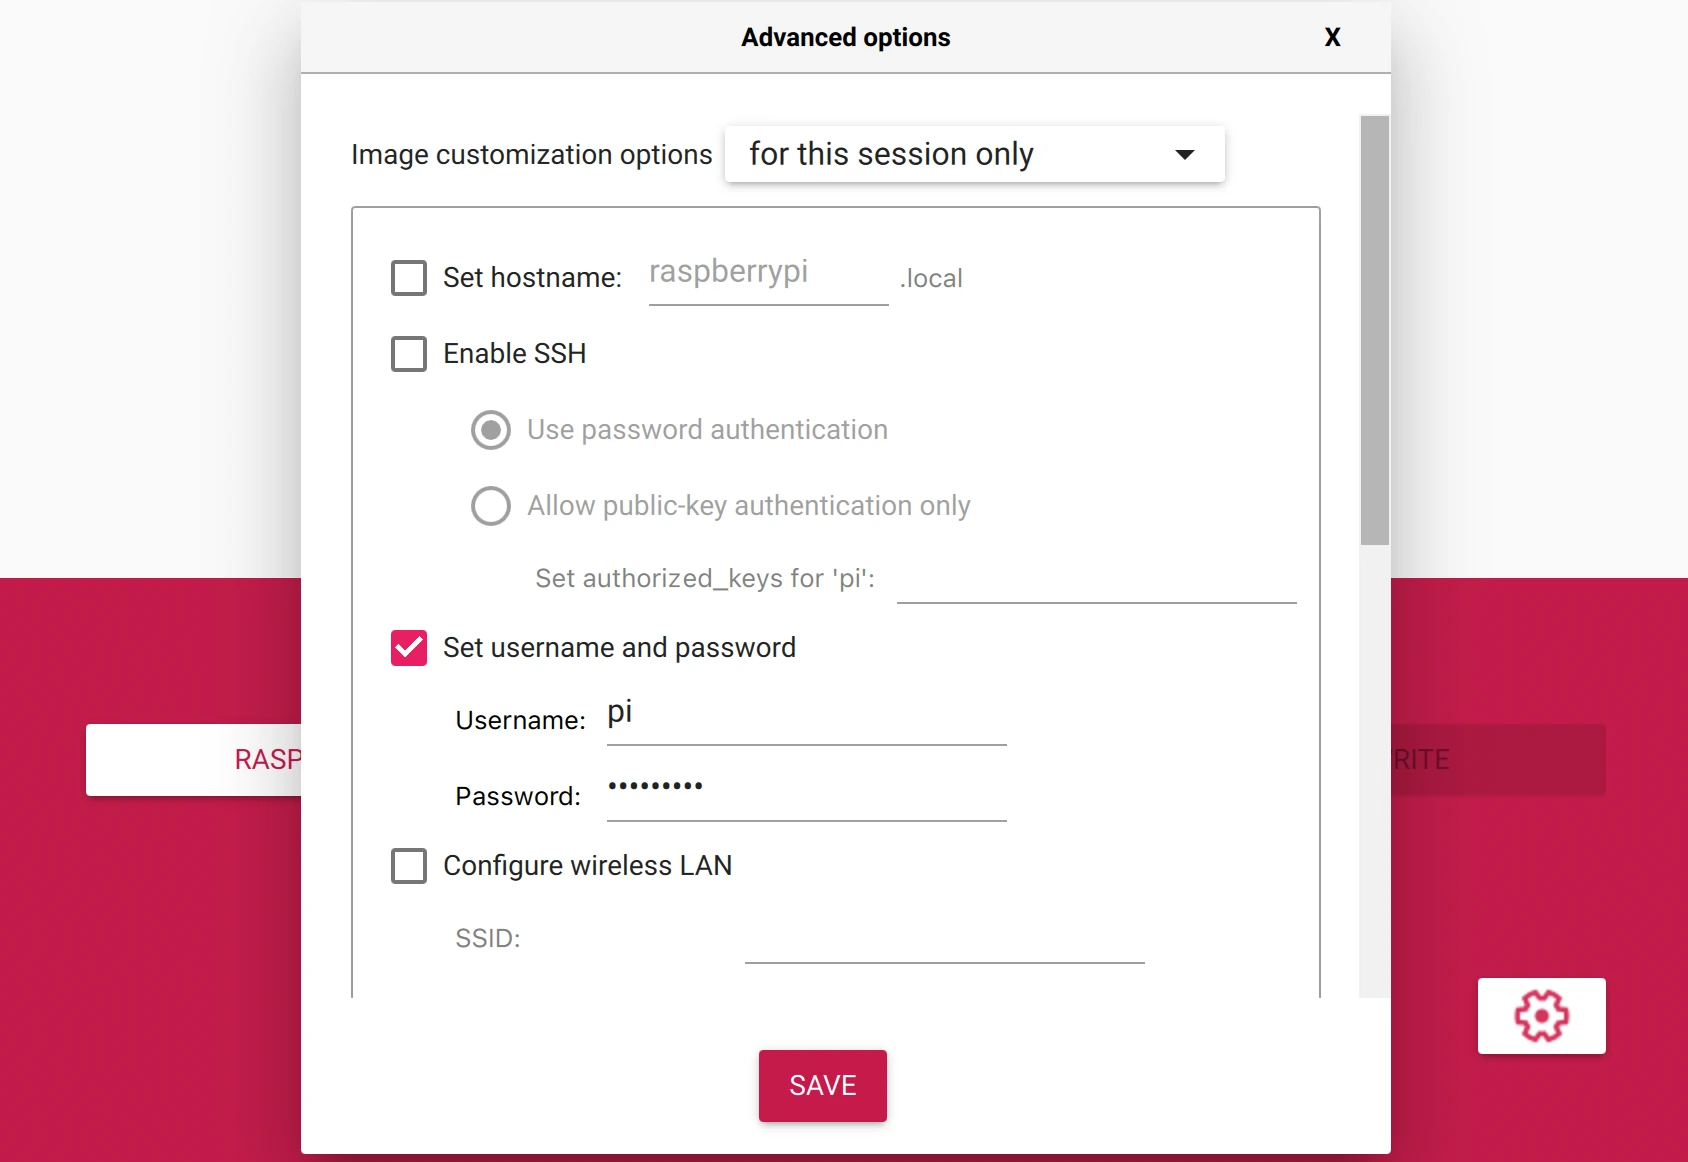
- Enable SSH on your Raspberry Pi by navigating to the Raspberry Pi Configuration tool.
- Find the SSH option and toggle it on.
- Reboot your Pi to apply the changes.
- Use an SSH client like PuTTY (for Windows) or Terminal (for macOS/Linux) to connect to your Pi from another device.
Once you’ve set up SSH, you can connect to your Pi using its IP address. Just type "ssh pi@your-pi-ip-address" into your terminal, and you’re good to go.
Troubleshooting Common SSH Issues
Of course, nothing’s perfect, and you might run into a few issues while setting up SSH. Here are some common problems and how to fix them:
- Connection Refused: Make sure SSH is enabled on your Pi and that your firewall isn’t blocking the connection.
- Incorrect IP Address: Double-check your Pi’s IP address to ensure you’re connecting to the right device.
- Authentication Failed: Ensure you’re using the correct username and password for your Pi.
With these tips, you’ll be troubleshooting like a pro in no time.
Using VNC for Remote Desktop Access
While SSH is great for command-line tasks, sometimes you need a full graphical interface. That’s where VNC comes in. VNC allows you to access your Raspberry Pi’s desktop remotely, giving you complete control over the system.
Here’s how you can set it up:
- Install the VNC Server on your Raspberry Pi by running "sudo apt install realvnc-vnc-server" in the terminal.
- Enable VNC in the Raspberry Pi Configuration tool.
- Download the VNC Viewer app on your device and connect to your Pi using its IP address.
Once connected, you’ll have full access to your Pi’s desktop, just as if you were sitting right in front of it.
Advantages and Disadvantages of VNC
VNC is a fantastic tool, but it’s not without its drawbacks. Here’s a quick breakdown:
- Pros: Full graphical interface, easy to use, great for beginners.
- Cons: Can be slow over a poor internet connection, requires more resources than SSH.
Ultimately, the choice between SSH and VNC depends on your specific needs and preferences.
Exploring Cloud-Based Solutions
If you’re looking for an even more convenient way to access your Raspberry Pi remotely, cloud-based solutions might be the way to go. Services like ngrok and PageKite allow you to expose your Pi’s local network to the internet, making it accessible from anywhere in the world.
Here’s how you can use ngrok:
- Download and install ngrok on your Raspberry Pi.
- Run "ngrok tcp 22" in the terminal to create a secure tunnel to your Pi’s SSH port.
- Use the provided ngrok URL to connect to your Pi from anywhere.
With cloud-based solutions, you can bypass the need for static IP addresses and complex port forwarding configurations, making remote access a breeze.
Security Considerations for Cloud Access
While cloud-based solutions are convenient, they also come with security risks. Here are a few tips to keep your Pi safe:
- Use strong passwords and enable two-factor authentication whenever possible.
- Limit access to trusted devices and IP addresses.
- Regularly update your Pi’s software to patch any security vulnerabilities.
By following these best practices, you can enjoy the benefits of cloud access without compromising your security.
Setting Up a Static IP Address
One of the keys to successful remote access is having a reliable IP address. By default, most routers assign dynamic IP addresses to devices, which can change every time you reboot your Pi. To avoid this headache, you can set up a static IP address.
Here’s how:
- Open the terminal on your Raspberry Pi and type "sudo nano /etc/dhcpcd.conf".
- Add the following lines to the file, replacing the placeholders with your network details:
interface eth0 static ip_address=192.168.1.100/24 static routers=192.168.1.1 static domain_name_servers=192.168.1.1
Save the file and reboot your Pi for the changes to take effect.
Why Static IPs Matter
Having a static IP address ensures that your Pi’s address remains consistent, making it easier to connect to remotely. It also simplifies port forwarding and DNS configuration, which we’ll cover in the next section.
Configuring Port Forwarding
If you want to access your Raspberry Pi from outside your local network, you’ll need to configure port forwarding on your router. This allows incoming traffic to reach your Pi by directing it to the correct IP address and port.
Here’s a step-by-step guide:
- Log in to your router’s admin interface using a web browser.
- Locate the port forwarding section and create a new rule.
- Set the external port to the one you want to use (e.g., 22 for SSH).
- Set the internal IP address to your Raspberry Pi’s static IP.
- Save the changes and test the connection.
With port forwarding set up, you’ll be able to access your Pi from anywhere in the world.
Tips for Secure Port Forwarding
Port forwarding can expose your network to potential threats, so it’s important to take security seriously. Here are a few tips:
- Use non-standard ports to make it harder for attackers to find your Pi.
- Limit access to specific IP addresses or ranges.
- Monitor your network for suspicious activity and block any unauthorized access attempts.
By following these guidelines, you can enjoy the convenience of remote access without compromising your security.
Using Dynamic DNS for Easy Access
Another way to simplify remote access is by using a Dynamic DNS (DDNS) service. DDNS assigns a domain name to your Pi’s IP address, making it easier to remember and access. Plus, it automatically updates the domain when your IP address changes.
Here’s how you can set it up:
- Sign up for a DDNS service like No-IP or DuckDNS.
- Install the DDNS client on your Raspberry Pi and configure it with your account details.
- Use the assigned domain name to connect to your Pi from anywhere.
With DDNS, you’ll never have to worry about remembering complex IP addresses again.
Benefits of DDNS
DDNS offers several advantages over traditional IP-based access:
- Easy to remember domain names.
- Automatic updates for changing IP addresses.
- Works with both static and dynamic IP addresses.
Whether you’re a beginner or an expert, DDNS is a great tool to have in your remote access toolkit.
Best Practices for Secure Remote Access
Security should always be a top priority when setting up remote access for your Raspberry Pi. Here are some best practices to keep your system safe:
- Use strong, unique passwords for all accounts.
- Enable two-factor authentication whenever possible.
- Regularly update your Pi’s software to patch security vulnerabilities.
- Limit access to trusted devices and IP addresses.
- Monitor your network for suspicious activity and block any unauthorized access attempts.
By following these guidelines, you can enjoy the benefits of remote access without compromising your security.
Staying Safe in the Digital World
The digital world is full of threats, but with the right precautions, you can protect your Raspberry Pi and your data. Remember, security is an ongoing process, so stay vigilant and keep learning.
Conclusion: Taking Your Raspberry Pi to the Next Level
So there you have it—everything you need to know about accessing your Raspberry Pi remotely. From SSH to VNC, cloud-based solutions to DDNS, the options are endless. The key is to choose the method that best suits your needs and preferences.
Before we wrap up, let’s quickly recap the main points:
- SSH is great for command-line tasks and is easy to set up.
- VNC provides a full graphical interface but requires more resources.
- Cloud-based solutions like ngrok make remote access a breeze.
- Static IP addresses, port forwarding, and DDNS simplify the process.
- Security should always be a top priority.
Now that you’ve got the knowledge, it’s time to put it into action. Whether you’re building a home automation system or managing a server farm, remote access to your Raspberry Pi will take your projects to the next level.
So, what are you waiting for? Grab your Pi, roll up your sleeves, and get started! And don’t forget to share your experiences in the comments below. We’d love to hear how you’re using remote access to enhance your Raspberry Pi projects. Happy tinkering, and see you in the next one!


Detail Author:
- Name : Jacey Gerlach
- Username : hrohan
- Email : vallie48@bergstrom.biz
- Birthdate : 1979-08-31
- Address : 3212 Hoeger Loaf Volkmanville, TN 87786
- Phone : +1-573-322-3135
- Company : Jacobson PLC
- Job : Medical Laboratory Technologist
- Bio : Molestias incidunt consequatur aliquid eaque. Et esse minima est illo quaerat unde. Beatae reiciendis ex numquam ipsa harum voluptatem.
Socials
twitter:
- url : https://twitter.com/sydnie9518
- username : sydnie9518
- bio : Et velit placeat omnis rem dignissimos consequatur. Beatae eius doloribus eos. Corrupti et et molestiae ut et.
- followers : 3049
- following : 420
instagram:
- url : https://instagram.com/sydniemertz
- username : sydniemertz
- bio : Id quam ut eum eaque necessitatibus. Ea nam adipisci nemo.
- followers : 6944
- following : 1371
linkedin:
- url : https://linkedin.com/in/sydnie_mertz
- username : sydnie_mertz
- bio : Et et perferendis repellat quia aut nemo ex.
- followers : 1982
- following : 95
