SSH IoT From Remote Host AWS: The Ultimate Guide For Secure Connectivity
Connecting IoT devices to a remote host on AWS using SSH is one of the most secure and efficient ways to manage your devices remotely. In today’s fast-paced world, where IoT is growing exponentially, having a reliable method to access and manage these devices is crucial. Whether you’re a developer, an IT admin, or just someone curious about IoT and cloud computing, this guide has got you covered.
Imagine this scenario: you have dozens of IoT devices spread across different locations, and you need to monitor or update them without physically being there. Sounds like a nightmare, right? Well, not anymore. By leveraging SSH and AWS, you can easily connect to your IoT devices from anywhere in the world. This guide will walk you through everything you need to know to set up and manage your IoT devices securely.
Before we dive into the nitty-gritty, let’s quickly talk about why SSH and AWS are such a powerful combo. SSH, or Secure Shell, provides a secure way to access remote systems, while AWS offers the robust infrastructure needed to handle large-scale IoT deployments. Together, they form a perfect solution for managing IoT devices remotely. So, buckle up, because we’re about to take you on a journey through the world of IoT and AWS.
- Hdhub4u South Movie Hindi Dubbed Your Ultimate Guide To South Indian Movies In Hindi
- Hdhub4u Movie Hindi The Ultimate Guide To Your Favorite Bollywood Movies
Why SSH IoT from Remote Host AWS Matters
Let’s get real for a sec. IoT devices are everywhere—smart homes, factories, hospitals, you name it. But managing these devices remotely can be a real pain if you don’t have the right tools. That’s where SSH IoT from remote host AWS comes in. This method allows you to securely connect to your IoT devices, no matter where they are, ensuring that your data stays safe and your devices stay operational.
Here’s the deal: traditional methods of remote access often lack the security features needed to protect sensitive data. But with SSH, you get encryption, authentication, and secure data transfer—all in one package. Plus, AWS provides the scalability and reliability you need to handle large-scale IoT deployments. It’s like having a superhero team for your IoT devices.
Benefits of Using SSH with AWS for IoT
Let’s break down the benefits of using SSH IoT from remote host AWS. This isn’t just about convenience; it’s about security, efficiency, and peace of mind.
- Movierulz Download 2025 Your Ultimate Guide To Streaming Movies Legally
- Lorne Stormonth Darling The Unsung Hero Of British Politics
- Security: SSH ensures that all communication between your device and the remote host is encrypted, protecting your data from prying eyes.
- Scalability: AWS can handle as many IoT devices as you need, whether you have 10 or 10,000.
- Reliability: AWS infrastructure is built to be reliable, so you can trust it to keep your devices connected and operational.
- Cost-Effective: By using AWS, you only pay for what you use, making it a cost-effective solution for managing IoT devices.
Setting Up SSH IoT from Remote Host AWS
Alright, now that we’ve covered why SSH IoT from remote host AWS is so important, let’s talk about how to set it up. Don’t worry; it’s not as complicated as it sounds. We’ll walk you through the process step by step, so even if you’re new to this, you’ll be able to follow along.
Step 1: Create an AWS Account
First things first, you’ll need an AWS account. If you don’t already have one, head over to the AWS website and sign up. It’s free to start, and you’ll get access to a bunch of cool features that’ll help you manage your IoT devices.
Step 2: Set Up an EC2 Instance
Once you’ve got your AWS account set up, it’s time to create an EC2 instance. Think of this as a virtual server where your IoT devices will connect. Here’s how you do it:
- Log in to your AWS Management Console.
- Go to the EC2 dashboard and click on "Launch Instance."
- Choose an Amazon Machine Image (AMI) that suits your needs. For most IoT projects, the Amazon Linux AMI is a good choice.
- Select an instance type. If you’re just starting out, a t2.micro instance should suffice.
- Configure your instance settings, such as storage and security groups.
- Review and launch your instance, making sure to download your key pair (.pem file). You’ll need this for SSH access.
Step 3: Configure Security Groups
Security groups act like firewalls for your EC2 instance. You’ll want to configure them to allow SSH access from your IP address. Here’s how:
- Go to the EC2 dashboard and click on "Security Groups."
- Select the security group associated with your instance.
- Click on "Edit inbound rules" and add a new rule for SSH.
- Set the source to your IP address or choose "Anywhere" if you want to allow access from any location (not recommended for production environments).
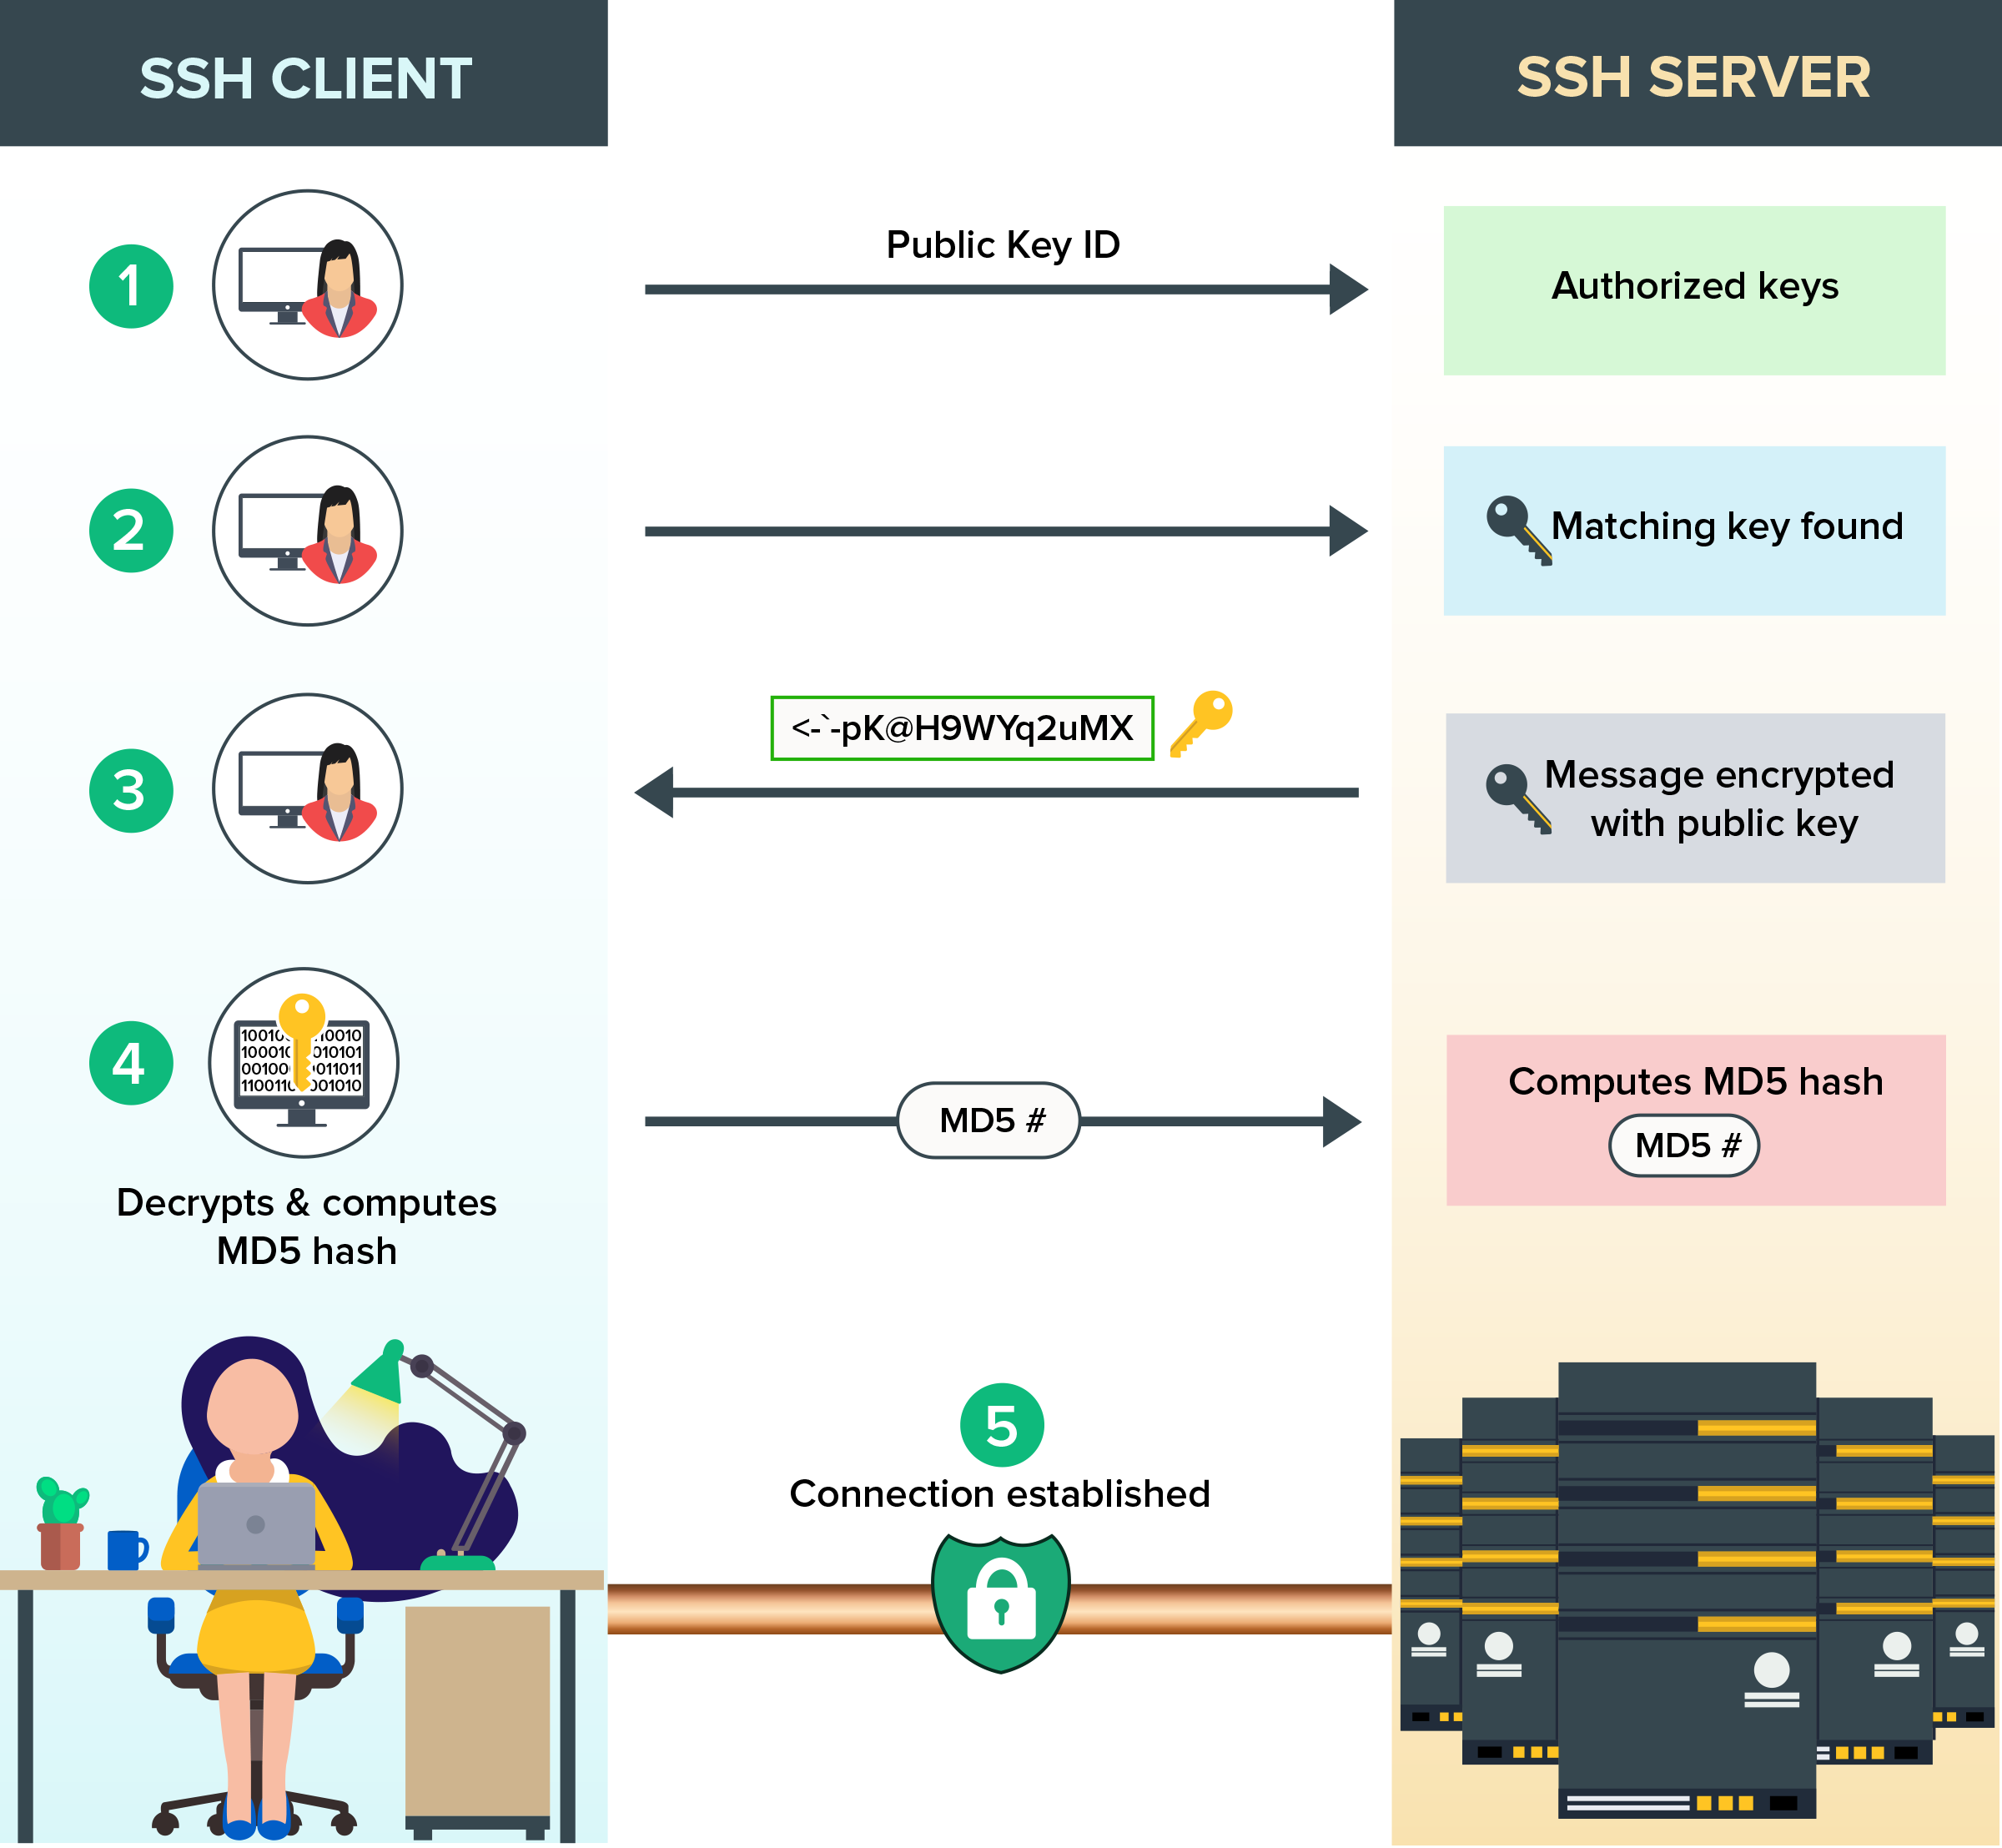
Connecting to Your IoT Device via SSH
Now that your EC2 instance is set up and ready to go, it’s time to connect to your IoT device via SSH. This is where the magic happens. Follow these steps to establish a secure connection:
Step 1: Install SSH on Your IoT Device
Before you can connect to your IoT device, you’ll need to make sure SSH is installed and running. Most Linux-based IoT devices come with SSH pre-installed, but if yours doesn’t, you can install it using the package manager. For example, on a Raspberry Pi, you can run:
sudo apt-get update && sudo apt-get install openssh-server
Step 2: Connect to Your EC2 Instance
With SSH installed on your IoT device, it’s time to connect to your EC2 instance. Open a terminal on your local machine and run the following command:
ssh -i /path/to/your-key.pem ec2-user@your-ec2-public-ip
Replace /path/to/your-key.pem with the path to your .pem file and your-ec2-public-ip with the public IP address of your EC2 instance.
Step 3: Forward Traffic to Your IoT Device
Once you’re connected to your EC2 instance, you can forward traffic to your IoT device using SSH tunneling. This allows you to securely access your device as if it were on the same network as your EC2 instance. Here’s how:
ssh -L 2222:iot-device-ip:22 ec2-user@your-ec2-public-ip
Replace iot-device-ip with the IP address of your IoT device. Now, you can connect to your IoT device by running:
ssh -p 2222 pi@localhost
Best Practices for SSH IoT from Remote Host AWS
While SSH IoT from remote host AWS is a powerful tool, there are some best practices you should follow to ensure everything runs smoothly:
- Use Strong Passwords: Always use strong, unique passwords for your IoT devices and EC2 instances.
- Keep Software Updated: Regularly update your IoT devices and EC2 instances to patch any security vulnerabilities.
- Limit Access: Restrict SSH access to only the IP addresses you trust.
- Monitor Logs: Keep an eye on your logs to detect any suspicious activity.
Common Issues and Troubleshooting
Even with the best setup, things can go wrong sometimes. Here are some common issues you might encounter and how to troubleshoot them:
Issue 1: Unable to Connect via SSH
If you’re having trouble connecting via SSH, check the following:
- Make sure your security groups allow SSH access from your IP address.
- Verify that your .pem file has the correct permissions (
chmod 400 your-key.pem). - Ensure that the SSH service is running on your IoT device.
Issue 2: Slow Connection
If your connection is slow, try the following:
- Optimize your EC2 instance by selecting a larger instance type if necessary.
- Reduce the amount of data being transferred over SSH.
- Check for network congestion or bottlenecks.
Advanced Techniques for SSH IoT from Remote Host AWS
Once you’ve got the basics down, you can start exploring some advanced techniques to take your SSH IoT from remote host AWS setup to the next level:
SSH Tunneling for Multiple Devices
Did you know you can use SSH tunneling to connect to multiple IoT devices through a single EC2 instance? This can save you time and resources, especially if you have a large number of devices. Here’s how:
- Set up separate SSH tunnels for each device, using different local ports.
- Connect to each device using the corresponding local port.
Automating SSH Connections
Automating SSH connections can save you a lot of time, especially if you frequently connect to the same devices. You can use tools like SSH keys and SSH config files to streamline the process:
- Create SSH keys for each device to eliminate the need for passwords.
- Set up an SSH config file to store connection details for each device.
Future Trends in IoT and AWS
As IoT continues to evolve, so do the tools and technologies used to manage it. AWS is at the forefront of this evolution, offering cutting-edge solutions for IoT developers and administrators. Here are some trends to watch out for:
- Edge Computing: By processing data closer to the source, edge computing can reduce latency and improve performance.
- Machine Learning: AWS offers a range of machine learning services that can help you analyze and act on IoT data in real-time.
- 5G Connectivity: With the advent of 5G, IoT devices will be able to communicate faster and more reliably than ever before.
Conclusion
SSH IoT from remote host AWS is a powerful solution for managing IoT devices securely and efficiently. Whether you’re a developer, an IT admin, or just someone interested in IoT, this guide has provided you with the knowledge and tools you need to get started. Remember to follow best practices, keep your software updated, and stay informed about the latest trends in IoT and AWS.
So, what are you waiting for? Start setting up your SSH IoT from remote host AWS today and take your IoT management to the next level. And don’t forget to share this article with your friends and colleagues. Who knows, you might just help them out too!
Table of Contents
- Why SSH IoT from Remote Host AWS Matters
- Benefits of Using SSH with AWS for IoT
- Setting Up SSH IoT from Remote Host AWS
- Connecting to Your IoT Device via SSH
- Best Practices for SSH IoT from Remote Host AWS
- Common Issues and Troubleshooting
- Advanced Techniques for SSH IoT from Remote Host AWS
- Future Trends in IoT and AWS
- Conclusion
Detail Author:
- Name : Ansley Lehner
- Username : hbarton
- Email : sanford17@lockman.info
- Birthdate : 1977-08-04
- Address : 181 Abagail Wall Apt. 620 South Gradyport, OH 05644-6405
- Phone : +1-763-352-7210
- Company : Collier-Upton
- Job : Optical Instrument Assembler
- Bio : Facilis et ipsum et alias voluptas odit. Rerum repellendus dolores culpa reiciendis praesentium. Ipsum quasi tempore labore qui. Non quis ut molestiae cum.
Socials
tiktok:
- url : https://tiktok.com/@cade_nader
- username : cade_nader
- bio : Voluptatem provident quia quidem expedita. Doloribus nostrum fugit aut.
- followers : 3223
- following : 1867
facebook:
- url : https://facebook.com/cade1768
- username : cade1768
- bio : Est et est veniam ea odit et.
- followers : 5343
- following : 2755
instagram:
- url : https://instagram.com/naderc
- username : naderc
- bio : Hic ea laudantium quis ipsam. A nisi delectus laborum error voluptatem.
- followers : 212
- following : 2444
twitter:
- url : https://twitter.com/cade_dev
- username : cade_dev
- bio : Repellat qui necessitatibus id veritatis autem consequatur. Vel quis necessitatibus laborum doloribus vel. Incidunt incidunt quidem possimus dolor qui ut.
- followers : 2177
- following : 1560
linkedin:
- url : https://linkedin.com/in/nader2009
- username : nader2009
- bio : Non et placeat nihil rerum ullam dolorem.
- followers : 2425
- following : 957
