SSH Raspberry Pi IoT From Anywhere Download Android: The Ultimate Guide
So, you're probably wondering how to SSH Raspberry Pi IoT from anywhere and even download the Android app to make things easier, right? Well, buckle up, my friend, because we're diving deep into this tech-savvy world where remote access meets the power of IoT. Whether you're a seasoned pro or just starting out, this guide will cover everything you need to know. From setting up your Raspberry Pi to accessing it from anywhere on the globe, we've got your back.
Now, let's get one thing straight: SSH (Secure Shell) is not just some fancy term thrown around by techies. It's a powerful tool that lets you control your Raspberry Pi remotely, no matter where you are. Combine that with IoT (Internet of Things), and you've got yourself a recipe for innovation. Plus, with the Android app, you can manage all of this right from your phone. Sounds cool, right? Let's break it down step by step.
Before we jump into the nitty-gritty, here's a quick rundown of what you'll learn in this article. First, we'll cover the basics of SSH and why it's such a game-changer. Then, we'll dive into setting up your Raspberry Pi for IoT projects. Finally, we'll show you how to access your Pi from anywhere and download the Android app to streamline the process. So, without further ado, let's get started!
- 4movierulz Telugu 2025 Your Ultimate Guide To The Latest Telugu Movie Scene
- Pinning For Kim Video The Ultimate Guide To Understanding And Maximizing Engagement
Why SSH Raspberry Pi IoT is a Must-Have
Let's face it: SSH isn't just a cool acronym; it's a lifeline for anyone working with remote devices. Whether you're tinkering with IoT projects or managing servers, SSH provides secure access to your Raspberry Pi from anywhere in the world. But why is it so important? Here's the scoop:
- Security: SSH encrypts your connection, keeping prying eyes away from your data.
- Convenience: Access your Raspberry Pi from any device with an internet connection.
- Flexibility: Manage your IoT projects remotely, no matter where you are.
- Scalability: SSH can handle multiple devices, making it perfect for large-scale IoT setups.
Now, imagine combining all of this with the power of IoT. Suddenly, you're not just controlling a single device; you're managing an entire network of smart gadgets. And with the Android app, you can do it all from the palm of your hand. Pretty neat, huh?
Setting Up Your Raspberry Pi for IoT
Alright, let's get down to business. Setting up your Raspberry Pi for IoT projects is easier than you might think. Here's a quick guide to get you started:
- Movierulz 2025 Your Ultimate Guide To Downloading Kannada Movies
- Unlock The World Of Anime Vegamovies Your Ultimate Guide To Streaming Anime
What You'll Need
Before you begin, make sure you have the following:
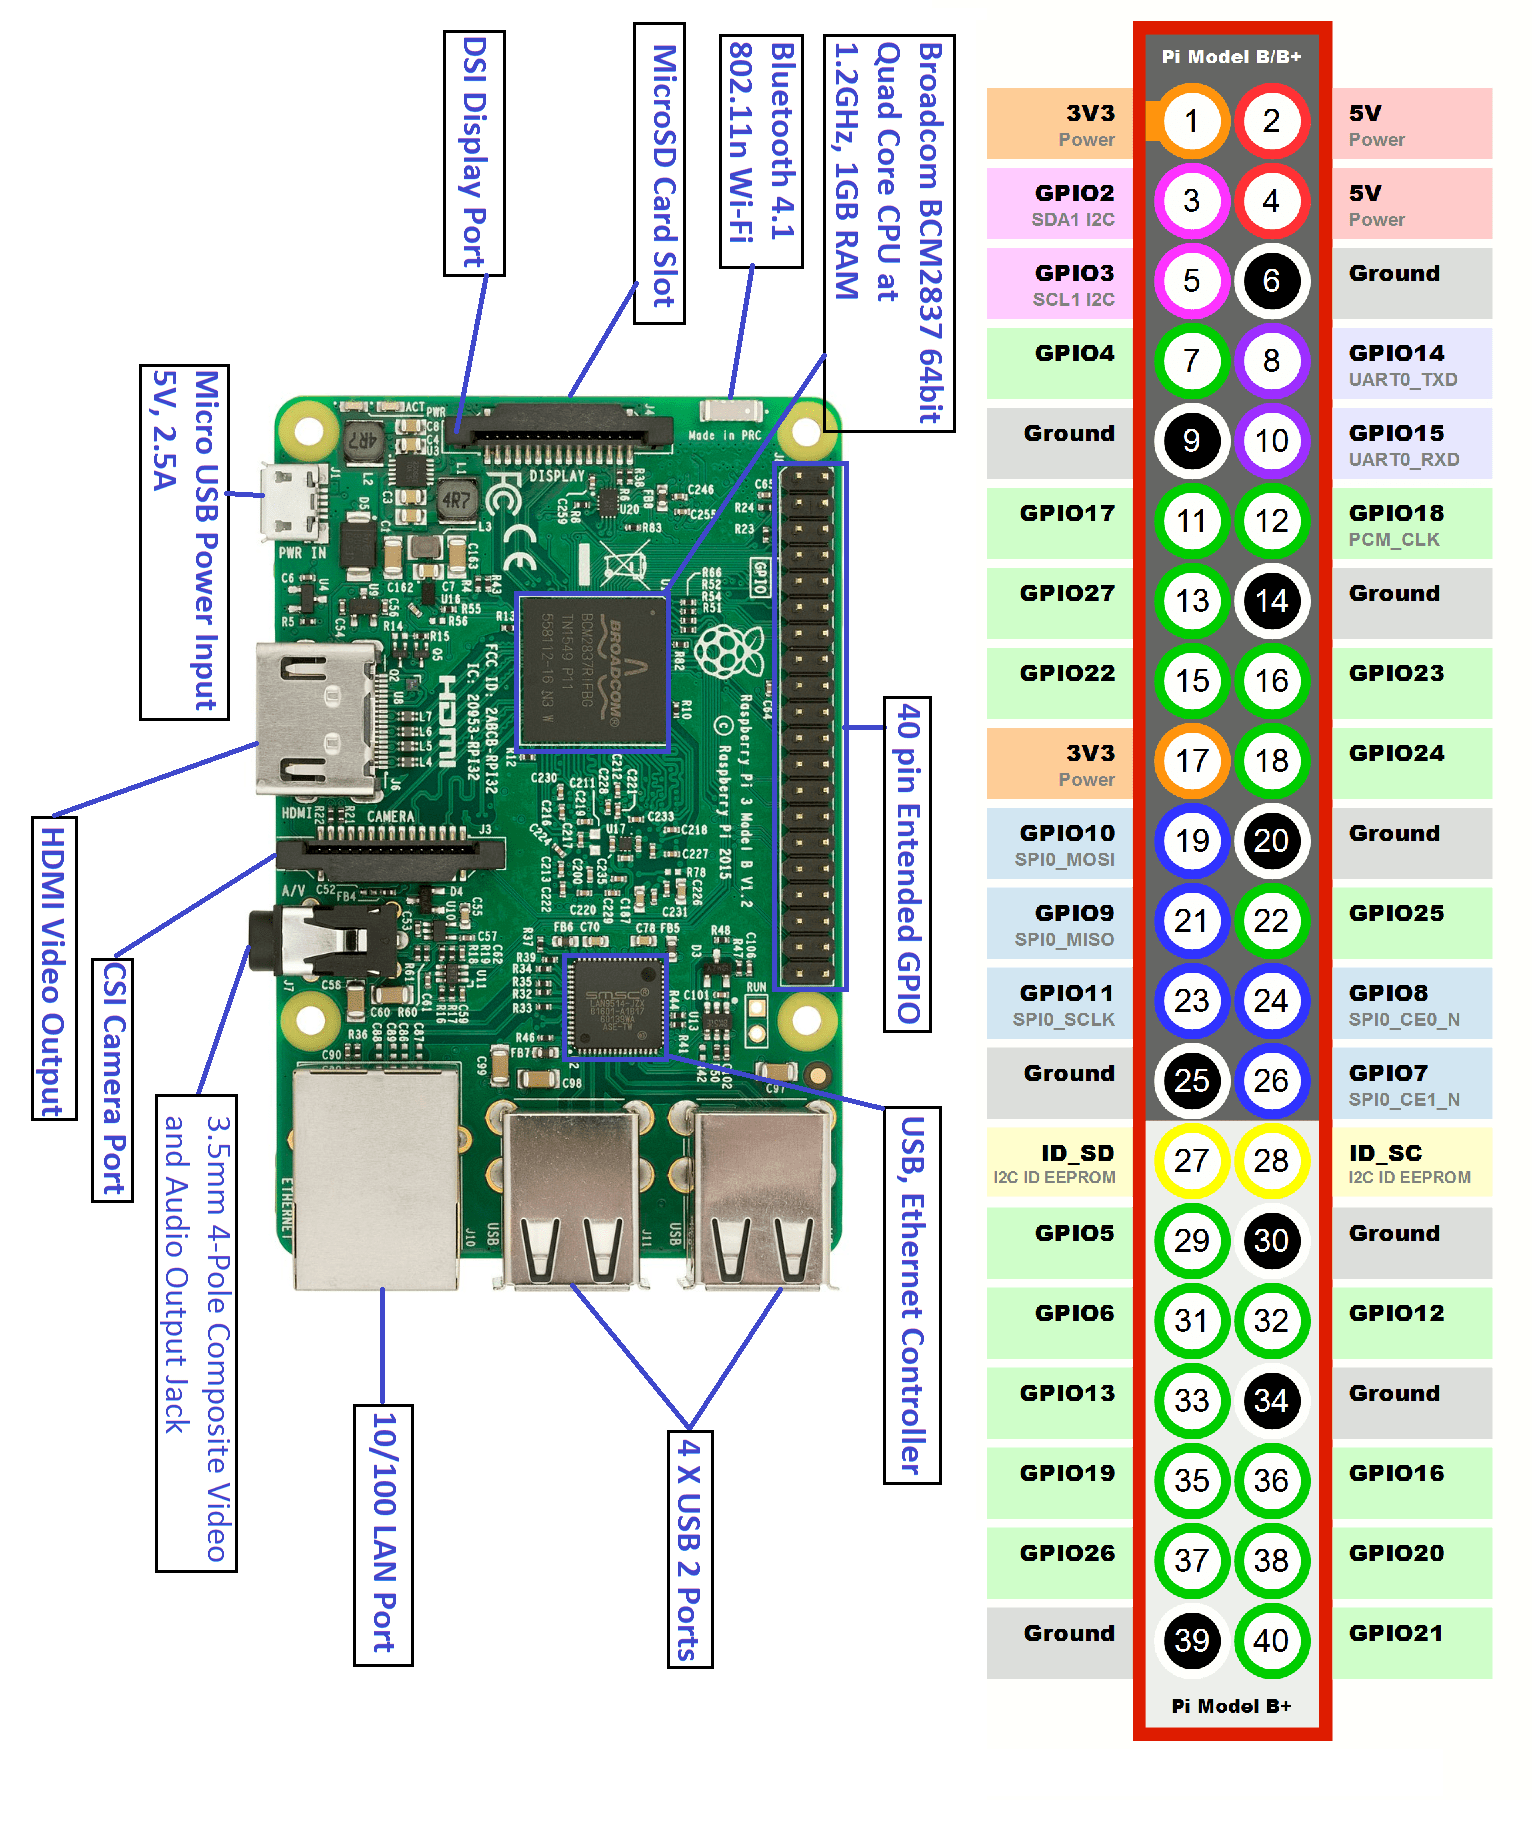
- Raspberry Pi (any model will do)
- MicroSD card with Raspberry Pi OS installed
- Power supply for your Raspberry Pi
- Internet connection
- Basic knowledge of Linux commands
Once you've gathered everything, it's time to move on to the next step.
Installing SSH on Your Raspberry Pi
Installing SSH on your Raspberry Pi is a breeze. Follow these simple steps:
- Boot up your Raspberry Pi and log in.
- Open the terminal and type
sudo apt updateto update your system. - Next, install SSH by typing
sudo apt install ssh. - Finally, enable SSH by typing
sudo systemctl enable ssh.
And just like that, you've got SSH up and running on your Raspberry Pi. Now, let's move on to the next step.
Connecting to Your Raspberry Pi from Anywhere
So, you've got SSH installed on your Raspberry Pi. But how do you connect to it from anywhere? That's where port forwarding and dynamic DNS come into play. Here's how you can set it up:
Setting Up Port Forwarding
Port forwarding allows you to access your Raspberry Pi from outside your local network. Here's how to do it:
- Log in to your router's admin panel.
- Find the port forwarding section and create a new rule.
- Set the external port to 22 (the default SSH port) and the internal port to your Raspberry Pi's IP address.
- Save the changes and restart your router.
With port forwarding set up, you can now access your Raspberry Pi from anywhere using its public IP address.
Using Dynamic DNS
Public IP addresses can change, which can make things tricky. That's where dynamic DNS comes in. Here's how to set it up:
- Sign up for a dynamic DNS service like No-IP or DuckDNS.
- Install the dynamic DNS client on your Raspberry Pi.
- Configure the client to update your domain name whenever your IP address changes.
Now, instead of remembering a long IP address, you can use a simple domain name to access your Raspberry Pi from anywhere.
Downloading the Android App for SSH
Alright, let's talk about the Android app. There are several great apps out there that allow you to SSH into your Raspberry Pi from your phone. One of the most popular is called "JuiceSSH." Here's how to download and set it up:
Downloading JuiceSSH
Head over to the Google Play Store and search for "JuiceSSH." Download and install the app on your Android device. It's free, but you can also opt for the premium version if you want extra features.
Setting Up JuiceSSH
Once you've installed JuiceSSH, here's how to set it up:
- Open the app and tap the "+" icon to create a new connection.
- Enter your Raspberry Pi's domain name or IP address as the hostname.
- Set the port to 22 (the default SSH port).
- Enter your username and password for your Raspberry Pi.
- Save the connection and tap it to connect.
And just like that, you're connected to your Raspberry Pi from your Android device. Pretty cool, right?
Troubleshooting Common Issues
Even the best-laid plans can hit a snag. Here are some common issues you might encounter and how to fix them:
Connection Refused
If you're getting a "connection refused" error, double-check the following:
- Make sure SSH is enabled on your Raspberry Pi.
- Verify that port forwarding is set up correctly on your router.
- Ensure that your Raspberry Pi's IP address hasn't changed.
Authentication Failed
If you're getting an "authentication failed" error, try the following:
- Double-check your username and password.
- Make sure you're using the correct port (usually 22).
- Consider using SSH keys for added security.
By addressing these issues, you'll be back up and running in no time.
Exploring IoT Projects with Raspberry Pi
Now that you've got SSH up and running, it's time to explore some exciting IoT projects. Here are a few ideas to get you started:
Smart Home Automation
Use your Raspberry Pi to control smart home devices like lights, thermostats, and security systems. With SSH, you can manage everything from anywhere.
Environmental Monitoring
Set up sensors to monitor temperature, humidity, and air quality. Use your Raspberry Pi to collect and analyze the data remotely.
Security Camera System
Turn your Raspberry Pi into a security camera system. With SSH, you can access live footage from anywhere in the world.
These are just a few examples of what you can do with your Raspberry Pi and IoT. The possibilities are endless!
Security Best Practices for SSH
Security is paramount when it comes to SSH. Here are some best practices to keep your Raspberry Pi safe:
Use Strong Passwords
Avoid using simple passwords like "123456" or "password." Instead, use a combination of letters, numbers, and symbols to create a strong password.
Enable SSH Keys
SSH keys provide an extra layer of security. Generate a public and private key pair and use them to authenticate your connection.
Limit User Access
Restrict SSH access to only the users who need it. This minimizes the risk of unauthorized access.
By following these best practices, you'll ensure that your Raspberry Pi remains secure.
Conclusion: Take Your IoT Projects to the Next Level
And there you have it, folks! You now know how to SSH Raspberry Pi IoT from anywhere and even download the Android app to make things easier. Whether you're a tech enthusiast or a professional, this guide has provided you with all the tools you need to take your IoT projects to the next level.
Remember, the key to success lies in security, flexibility, and innovation. By combining SSH with IoT, you can manage your devices from anywhere in the world. And with the Android app, you can do it all from the palm of your hand.
So, what are you waiting for? Get out there and start tinkering! Don't forget to leave a comment below and share this article with your friends. Happy hacking!
Table of Contents
- Why SSH Raspberry Pi IoT is a Must-Have
- Setting Up Your Raspberry Pi for IoT
- Connecting to Your Raspberry Pi from Anywhere
- Downloading the Android App for SSH
- Troubleshooting Common Issues
- Exploring IoT Projects with Raspberry Pi
- Security Best Practices for SSH
- Conclusion


Detail Author:
- Name : Karlie Stehr
- Username : arlene.marks
- Email : melany06@yahoo.com
- Birthdate : 1986-06-27
- Address : 92638 Jayne Lake South Nicole, RI 44771
- Phone : 830.302.2310
- Company : Franecki Inc
- Job : Architecture Teacher
- Bio : Mollitia aliquam quia voluptates minus id incidunt iure. Harum vero voluptatum molestias odio consequuntur velit. Ut autem non et placeat eveniet. Est aut voluptatem quisquam vel.
Socials
twitter:
- url : https://twitter.com/halle_xx
- username : halle_xx
- bio : Sed dicta nihil ut asperiores. Impedit aliquid saepe quas molestiae corrupti. Sunt earum sit eum aliquam praesentium.
- followers : 2252
- following : 1630
instagram:
- url : https://instagram.com/hsmith
- username : hsmith
- bio : Non sint non ut perferendis. Optio ipsa dolorem et id est consequatur placeat.
- followers : 1935
- following : 2134
